Love this? Save it for later!
Share the inspiration with your friends
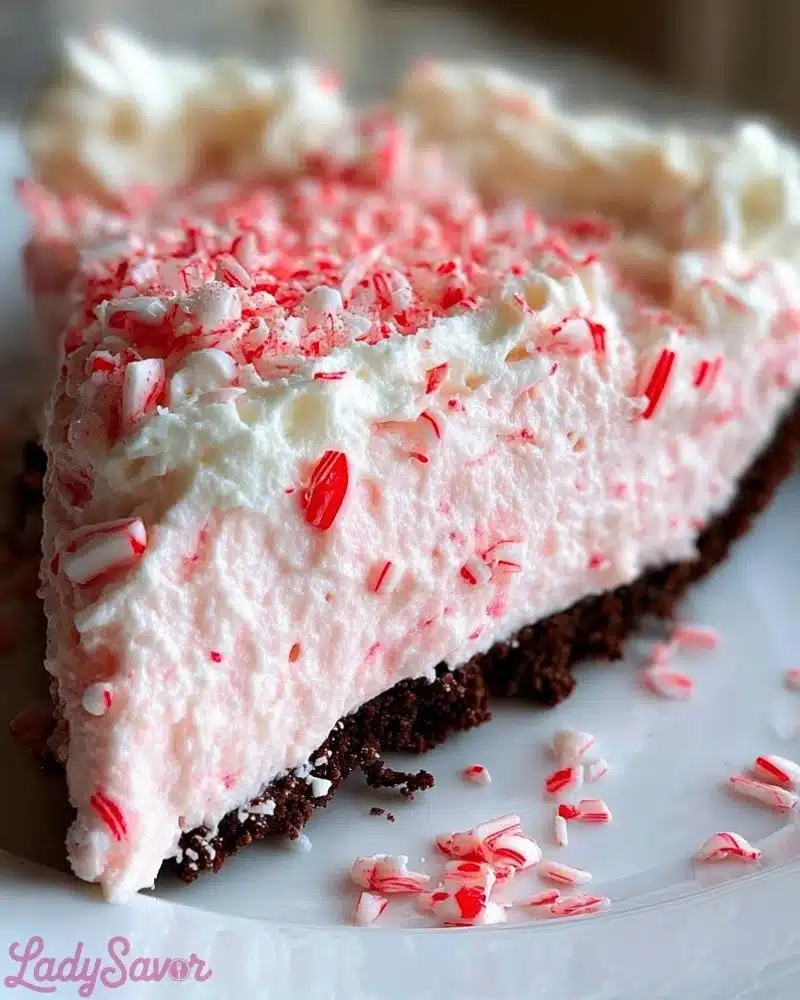
“You’re telling me this is no-bake?” my friend asked skeptically as I slid the peppermint pie onto the counter. Honestly, I didn’t blame her—at first, I thought a no-bake dessert might be too simple or lacking something special. But this Easy Creamy No-Bake Christmas Peppermint Pie proved otherwise. It all started one chilly December evening when I was juggling holiday prep and realized I forgot to thaw the usual pie crust. I was close to giving up on dessert, but a quick riff with crushed peppermint and whipped cream turned into this creamy, minty miracle.
The smell of crushed candy canes and sweet cream filled my kitchen, and I remember pausing, spoon in hand, surprised at how perfectly the flavors came together. It wasn’t just a quick fix—it quickly became a holiday staple. Somehow, this pie captures the joyful chaos of the season and offers a moment of calm with its cool, refreshing taste. That first bite was a quiet reminder that sometimes the easiest things bring the biggest comforts. I keep making it every year—not just because it’s festive, but because it feels like a little pause in the madness, a creamy peppermint hug on a plate.
Why You’ll Love This Recipe
I know holiday desserts can get complicated, but this Easy Creamy No-Bake Christmas Peppermint Pie is different. I’ve made this recipe over and over (seriously, three times last week alone), tweaking here and there to get the texture just right. It’s been tested in my kitchen, approved by friends, and even my not-so-easy-to-please cousin gave it two thumbs up.
- Quick & Easy: Ready in about 20 minutes, plus chilling time—perfect for those hectic holiday days when you want a treat without the fuss.
- Simple Ingredients: No need for fancy stores; most are pantry or holiday staples like crushed candy canes, cream cheese, and whipped topping.
- Perfect for Holiday Gatherings: Whether it’s a family dinner or a last-minute party, this pie stands out without demanding hours in the kitchen.
- Crowd-Pleaser: Kids love the peppermint crunch, adults appreciate the creamy texture, and everyone asks for seconds.
- Unbelievably Delicious: That cool peppermint flavor paired with smooth creaminess is a holiday combo that just works.
What sets this pie apart is the no-bake approach combined with a perfectly balanced peppermint kick. Instead of overwhelming sweetness, it’s fresh and light—thanks to a blend of cream cheese and whipped topping that keeps it silky. I’ve tried other peppermint pies, but this one’s texture and ease make it my go-to. Honestly, it feels like a little holiday magic that anyone can pull off, no baking skills required.
What Ingredients You Will Need
This recipe uses simple, wholesome ingredients that come together easily to create a bold peppermint flavor and satisfyingly creamy texture without any fuss. Most are pantry staples or holiday treats you likely already have on hand.
- For the crust:
- Chocolate wafer cookies or chocolate graham crackers, crushed (about 1 ½ cups) – I prefer Nabisco Famous Chocolate Wafers for the best crunch
- Unsalted butter, melted (6 tablespoons) – adds richness and helps bind the crust
- Granulated sugar (2 tablespoons) – balances the chocolate’s bitterness
- For the filling:
- Cream cheese, softened (8 ounces / 225 grams) – smooth and tangy base
- Powdered sugar (¾ cup / 90 grams) – for sweetness without grit
- Heavy whipping cream (1 cup / 240 ml), cold – whipped to soft peaks for that fluffy texture
- Peppermint extract (1 teaspoon) – the star flavor; don’t overdo it or it gets too intense
- Crushed peppermint candies or candy canes (½ cup) – for festive crunch and bright flavor
- Optional: Red food coloring (a few drops) – if you want to add a holiday pop of color to the filling
- For topping (optional):
- Whipped cream (½ cup) – for dolloping on top
- Extra crushed peppermint candies – for garnish
- Chocolate shavings or curls – adds a nice finishing touch
For substitutions, you can swap the heavy cream with coconut cream for a dairy-free version, and almond flour crust works if gluten-free is needed. Using fresh peppermint extract instead of artificial flavoring really makes a difference; I like the one from McCormick. And if it’s summertime or you prefer a fruity twist, you might try an easy no-bake raspberry chocolate truffle recipe for something similarly simple but different.
Equipment Needed
- 9-inch (23 cm) pie dish – glass or ceramic works well for chilling and presentation
- Food processor or a sturdy plastic bag and rolling pin (for crushing cookies) – food processor makes quick work, but a bag and rolling pin works fine if you’re low-tech
- Electric mixer or stand mixer – essential for whipping the cream and beating the cream cheese until smooth
- Mixing bowls – at least two, one for crust and one for filling
- Spatula – for folding whipped cream into the cream cheese mixture gently
- Measuring cups and spoons – precise measurements matter for the right texture
If you don’t have a food processor, crushing the cookies by hand in a zip-top bag does the trick (I’ve done it multiple times when the processor was tied up). Keep your mixer bowl chilled for whipping cream faster, and if you’re on a budget, a simple handheld electric mixer works just fine.
Preparation Method
- Prepare the crust: Crush 1 ½ cups of chocolate wafer cookies until fine crumbs form. Use a food processor or place cookies in a zip-top bag and crush with a rolling pin. Combine crumbs with 6 tablespoons melted butter and 2 tablespoons granulated sugar in a bowl. Mix until crumbs are evenly coated and start to clump.
- Press crust into the pie dish: Transfer crumb mixture to your 9-inch pie dish and press firmly and evenly along the bottom and up the sides using the back of a spoon or your fingers. Chill the crust in the refrigerator while you prepare the filling (about 15 minutes).
- Make the filling base: In a large bowl, beat 8 ounces softened cream cheese with ¾ cup powdered sugar until smooth and creamy. This should take about 2-3 minutes on medium speed. Scrape down the sides to avoid lumps.
- Whip the cream: In a separate chilled bowl, whip 1 cup cold heavy cream using an electric mixer on medium-high speed until soft peaks form. This usually takes around 3-5 minutes. Be careful not to overwhip; you want it fluffy but still smooth.
- Combine flavors: Add 1 teaspoon peppermint extract to the cream cheese mixture. If you want a festive pink tint, add a few drops of red food coloring now and blend gently.
- Fold in whipped cream: Gently fold the whipped cream into the cream cheese mixture using a spatula. Use slow, careful motions to keep the filling light and airy.
- Mix in crushed peppermint candies: Fold in ½ cup crushed peppermint candies for that signature crunch and flavor burst.
- Assemble the pie: Spoon the filling over the chilled crust and smooth the top with an offset spatula or the back of a spoon.
- Chill the pie: Refrigerate the pie for at least 4 hours, preferably overnight, to let it set firmly. This step is crucial for the texture and flavor melding.
- Add the finishing touches: Before serving, optionally top with dollops of whipped cream, extra crushed peppermint, and chocolate curls for a festive look.
Pro tip: When folding in the whipped cream, don’t rush or stir aggressively—that’s a common pitfall that deflates the mixture and makes it dense. Also, if your cream cheese isn’t perfectly softened, the filling can feel lumpy, so leave it out at room temperature for at least 30 minutes beforehand. For a faster set, pop the pie in the freezer for 1 hour, but watch it closely to avoid freezing solid.
Cooking Tips & Techniques
Working with no-bake pies means texture is everything, and a few tricks make all the difference. First, crushing the cookies finely ensures the crust sticks together well—chunky crumbs just won’t hold. Personally, I always toast the crust crumbs lightly in the oven for 5 minutes before mixing with butter, which adds a subtle depth and crunch.
Whipping cream to soft peaks is another key. Too soft, and the filling won’t hold; too stiff, and it can turn grainy. I learned the hard way that chilling your mixing bowl and beaters in the freezer for 10 minutes before whipping cream really speeds up the process and yields perfect softness.
Folding whipped cream into cream cheese requires patience. Use a rubber spatula and cut through the mixture carefully, folding from bottom to top to keep the air you just whipped in. I’ve seen many well-intentioned cooks lose volume by stirring too vigorously.
Don’t skip the chilling time! No-bake pies need at least a few hours to firm up. I usually make this pie the night before a holiday meal, so it’s ready to impress without last-minute stress.
If peppermint extract is new to you, add it gradually. It’s easy to go overboard and end up with a sharp, almost medicinal taste. A teaspoon is just right for this recipe’s balance.
Variations & Adaptations
This peppermint pie is super adaptable, so you can make it your own depending on taste or dietary needs:
- Dairy-free version: Swap cream cheese for a plant-based cream cheese alternative and use coconut cream instead of heavy cream. The texture changes slightly but remains creamy and festive.
- Chocolate peppermint: Add a layer of melted semi-sweet chocolate over the crust before adding the filling. It creates a rich double-layered dessert that’s extra indulgent.
- Fruit twist: Swap crushed peppermint candies for crushed freeze-dried raspberries or add a swirl of raspberry sauce in the filling for a bright contrast. If you like seasonal salads, this pairs nicely with a zesty asparagus salad like the fresh shaved asparagus salad with lemon dressing.
- Gluten-free crust: Use almond flour or gluten-free cookie crumbs instead of traditional wafers. Almond flour adds a nice nutty flavor that complements the peppermint.
- Extra crunch: Mix in chopped toasted pecans or walnuts into the crust or sprinkle on top for texture variation.
One personal favorite variation: I once added a splash of espresso powder to the crust mixture—it sounds odd, but the coffee highlights the chocolate and peppermint beautifully, making the pie taste a bit more grown-up.
Serving & Storage Suggestions
This peppermint pie is best served chilled, straight from the fridge. The creamy filling holds its shape nicely but melts beautifully in your mouth. I like to slice it with a warm knife (run under hot water and dry) for clean edges.
For a festive presentation, add a dollop of whipped cream and sprinkle extra crushed peppermint on top, maybe even a few dark chocolate shavings to contrast the white cream.
It pairs wonderfully with hot drinks like peppermint tea, coffee, or even a cozy hot cocoa. If you’re looking for a savory balance, serve alongside a simple, fresh salad or a light main dish like the healthy ground turkey lettuce wrap bowls, which keep the meal bright and fresh.
Store any leftovers covered in the refrigerator for up to 4 days. The flavors actually deepen a bit overnight, making it even better the next day. If you want to freeze it, wrap tightly in plastic wrap and aluminum foil to avoid freezer burn; thaw overnight in the fridge before serving.
Nutritional Information & Benefits
Each slice (based on 8 servings) contains approximately 320 calories, 18 grams of fat, 35 grams of carbohydrates, and 5 grams of protein. While it’s definitely a treat, the use of cream cheese adds a bit of protein and calcium, and peppermint extract can aid digestion and freshen breath, which is a nice little bonus after a holiday feast.
This recipe is naturally gluten-free if you use gluten-free cookie crumbs and can be dairy-free with the right substitutions. It’s a lighter alternative to heavier baked holiday pies, so you get the festive flavor without feeling weighed down. Plus, the peppermint flavor has a crisp coolness that feels refreshing rather than cloying.
Conclusion
This Easy Creamy No-Bake Christmas Peppermint Pie has become my go-to holiday dessert not because it’s fancy, but because it’s honest and reliable. It’s one of those recipes that makes the season feel manageable when everything else is a whirlwind. I love how it balances sweet, creamy, and minty with a satisfying crunch—plus, it’s a no-bake miracle that anyone can pull off.
Feel free to make it your own by adjusting the peppermint level or adding your favorite toppings. I’d love to hear how you customize this pie or what holiday traditions you pair it with. Sharing recipes like this is what makes the kitchen feel like home.
Thanks for stopping by—may your holidays be full of good food and even better company!
Frequently Asked Questions
Can I make this pie ahead of time?
Absolutely! This pie actually tastes better after chilling overnight. Just cover it tightly and refrigerate until ready to serve.
What can I use if I don’t have peppermint extract?
If you’re out of peppermint extract, you can try using spearmint extract or finely chopped fresh mint leaves, but the flavor will be milder and less traditional.
Is there a way to make this pie vegan?
Yes! Use vegan cream cheese, coconut cream whipped to peaks, and a dairy-free crust such as crushed vegan cookies with coconut oil instead of butter.
Can I substitute the chocolate cookie crust?
Definitely. You can use graham cracker crumbs, ginger snap crumbs for a spicy twist, or even crushed pretzels for a salty contrast.
How do I store leftover pie?
Keep leftovers covered in the fridge for up to 4 days. To maintain texture, avoid freezing if possible, but if you do freeze, thaw overnight in the fridge before serving.
Pin This Recipe!

Easy Creamy No-Bake Christmas Peppermint Pie

A quick and festive no-bake peppermint pie with a creamy filling and crunchy chocolate wafer crust, perfect for holiday gatherings.
- Prep Time: 20 minutes
- Cook Time: 0 minutes
- Total Time: 4 hours 20 minutes
- Yield: 8 servings 1x
- Category: Dessert
- Cuisine: American
Ingredients
- 1 ½ cups chocolate wafer cookies or chocolate graham crackers, crushed
- 6 tablespoons unsalted butter, melted
- 2 tablespoons granulated sugar
- 8 ounces cream cheese, softened
- ¾ cup powdered sugar
- 1 cup heavy whipping cream, cold
- 1 teaspoon peppermint extract
- ½ cup crushed peppermint candies or candy canes
- Optional: a few drops red food coloring
- Optional topping: ½ cup whipped cream
- Optional topping: extra crushed peppermint candies
- Optional topping: chocolate shavings or curls
Instructions
- Crush 1 ½ cups of chocolate wafer cookies until fine crumbs form using a food processor or a zip-top bag and rolling pin.
- Combine cookie crumbs with 6 tablespoons melted butter and 2 tablespoons granulated sugar in a bowl. Mix until evenly coated and clumping.
- Press the crumb mixture firmly and evenly into the bottom and up the sides of a 9-inch pie dish. Chill in the refrigerator for about 15 minutes.
- In a large bowl, beat 8 ounces softened cream cheese with ¾ cup powdered sugar until smooth and creamy, about 2-3 minutes on medium speed.
- In a separate chilled bowl, whip 1 cup cold heavy cream on medium-high speed until soft peaks form, about 3-5 minutes.
- Add 1 teaspoon peppermint extract and optional red food coloring to the cream cheese mixture and blend gently.
- Gently fold the whipped cream into the cream cheese mixture using a spatula, folding slowly to keep it light and airy.
- Fold in ½ cup crushed peppermint candies for crunch and flavor.
- Spoon the filling over the chilled crust and smooth the top with an offset spatula or back of a spoon.
- Refrigerate the pie for at least 4 hours or preferably overnight to set firmly.
- Before serving, optionally top with dollops of whipped cream, extra crushed peppermint, and chocolate curls.
Notes
Chill the mixing bowl and beaters before whipping cream for best results. Use softened cream cheese to avoid lumps. Fold whipped cream gently to keep the filling airy. For a faster set, freeze for 1 hour but watch closely to avoid freezing solid. Toasting crust crumbs lightly before mixing adds crunch and depth.
Nutrition
- Serving Size: 1 slice (1/8 of pie)
- Calories: 320
- Fat: 18
- Carbohydrates: 35
- Protein: 5
Keywords: no-bake pie, peppermint pie, Christmas dessert, holiday pie, creamy pie, peppermint candy, easy dessert