Love this? Save it for later!
Share the inspiration with your friends
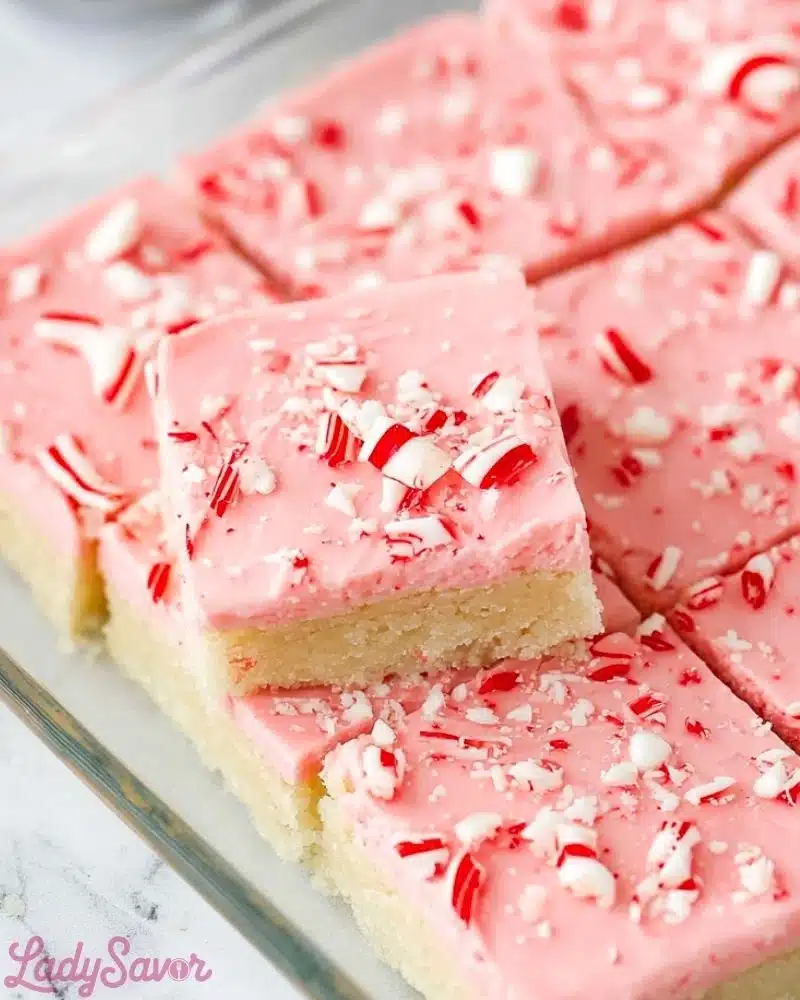
“I don’t usually bake,” I said, eyeing the leftover candy canes in the pantry. Honestly, I was just trying to clear some clutter before the holiday chaos fully set in. But then, on a whim, I crushed those peppermint sticks and stirred them into a batch of sugar cookie dough — and well, that accidental mix-up quickly became the highlight of our holiday treats this year. The kitchen smelled like winter wonderland and cinnamon-scented pine needles, and the bars? Let’s just say they vanished faster than I could slice them.
At first, I was skeptical about mixing peppermint candy directly into sugar cookie bars. I figured the flavor might be too strong or the texture off. But as the bars baked, the warm vanilla from the sugar cookie base softened the sharp peppermint into something cozy and inviting — the kind of treat you want to nibble on while wrapped in a blanket by the fire.
And here’s the kicker: these bars are surprisingly simple to make, with no complicated steps or fancy ingredients. It’s basically a shortcut to holiday magic that you can pull together when you’re juggling gifts, family, and all the festive madness. I found myself making them multiple times in the week leading up to Christmas — sharing with neighbors, sneaking bites after dinner, and even pairing them with a mug of hot cocoa for a quiet moment to myself.
So, if you’re looking for a holiday dessert that feels like a warm hug but comes together with ease, these Cozy Peppermint Sugar Cookie Bars might just be the recipe that sticks with you — the one that turns simple ingredients into something unforgettable.
Why You’ll Love This Recipe
Having tested this recipe over several holiday seasons, I can vouch for its crowd-pleasing charm and straightforward process. Whether you’re a seasoned baker or a kitchen newbie, these bars hit the sweet spot of festive and fuss-free.
- Quick & Easy: Ready in about 30 minutes from start to finish — perfect for squeezing in between holiday errands or last-minute guests.
- Simple Ingredients: No need for specialty stores; the pantry staples and peppermint candies are usually on hand during the holidays.
- Perfect for Holiday Gatherings: Great for cookie exchanges, office parties, or just cozy family nights.
- Crowd-Pleaser: Kids adore the sweet peppermint crunch, while adults appreciate the nostalgic flavors.
- Unbelievably Delicious: The bars boast a tender, chewy texture with just the right hint of peppermint — not overpowering but unmistakably festive.
What sets this apart from other peppermint desserts? The trick is in the crushed candy canes folded into the dough, which melt slightly while baking, creating pockets of refreshing peppermint that surprise you with every bite. Plus, the use of classic sugar cookie dough makes the bars buttery and tender — a warm base that balances the cool mint flavor perfectly.
In a way, these bars are like the cozy cousin of the chewy chocolate sugar cookie bars I love making for less minty occasions. And if you’re looking to pair this treat with other holiday sweets, the creamy texture reminds me a bit of the green velvet cupcakes that are always a hit during festive brunches. Honestly, these bars add that perfect touch of peppermint magic without any stress.
What Ingredients You Will Need
This recipe uses simple, wholesome ingredients to deliver bold flavor and satisfying texture without the fuss. Most are pantry staples, with peppermint candy canes adding that seasonal twist.
- For the Sugar Cookie Base:
- 1 cup (2 sticks, 226g) unsalted butter, softened (I like using Land O’Lakes for best texture)
- 1 cup (200g) granulated sugar
- 1 large egg, at room temperature
- 1 teaspoon pure vanilla extract (real vanilla makes a difference here!)
- 2 1/2 cups (312g) all-purpose flour, sifted
- 1/2 teaspoon baking powder
- 1/4 teaspoon salt
- For the Peppermint Crunch:
- 3/4 cup crushed peppermint candy canes (about 6 standard-sized sticks; I crush them in a zip-top bag with a rolling pin for easy cleanup)
- Optional Topping:
- 1/2 cup powdered sugar (for dusting or light glaze)
- 2 tablespoons milk (to make a simple glaze, if desired)
If you don’t have peppermint candy canes, crushed peppermint candies or even peppermint baking chips can work in a pinch. For a gluten-free version, swapping the all-purpose flour with a 1:1 gluten-free baking flour blend works well too.
Equipment Needed
- 9×13-inch baking pan (metal or glass works fine; I prefer glass for even baking)
- Mixing bowls (one large for dough, one small for dry ingredients)
- Electric mixer or sturdy wooden spoon (a stand mixer makes this quick, but hand mixing is totally doable)
- Measuring cups and spoons (accuracy matters for baking!)
- Rolling pin or heavy object (to crush candy canes)
- Spatula or wooden spoon (for folding in the peppermint)
- Wire rack (for cooling bars evenly)
If you don’t have a 9×13 pan, a similarly sized square or rectangular baking dish will do. Just keep an eye on baking time, as thinner bars may bake faster. I’ve even used disposable aluminum pans for gifting — they bake just as well and save on cleanup.
Preparation Method
- Preheat your oven to 350°F (175°C). Lightly grease your 9×13-inch baking pan or line it with parchment paper for easy removal. This step always saves me from a sticky mess later.
- Cream the butter and sugar: In a large bowl, beat the softened butter and granulated sugar together until light and fluffy, about 3 to 5 minutes. This step is key for that tender crumb. The mixture should look pale and slightly airy.
- Add the egg and vanilla: Beat in the egg and vanilla extract until fully incorporated. The dough will look smooth and glossy now.
- Mix dry ingredients: In a separate bowl, whisk together the all-purpose flour, baking powder, and salt.
- Combine wet and dry: Gradually add the flour mixture to the wet ingredients, mixing just until combined. Overmixing can make the bars tough, so stop as soon as the dough comes together.
- Fold in the crushed peppermint: Gently fold the peppermint candy pieces into the dough, distributing them evenly but without squashing all the chunks. You want those little pockets of minty surprise.
- Press the dough into the pan: Transfer the dough to your prepared pan and press it down evenly with your hands or the back of a spatula. It’ll be thick and slightly sticky, but don’t worry — this is perfect for chewy bars.
- Bake: Place in the oven and bake for 20 to 25 minutes. You’re looking for a lightly golden edge and a set center that still feels slightly soft when touched. A toothpick inserted should come out with a few moist crumbs.
- Cool completely: Remove from the oven and let the bars cool in the pan on a wire rack. Cooling fully is important — cutting too soon can make a crumbly mess.
- Optional glaze: If you want a little extra sweetness, whisk powdered sugar with milk until smooth and drizzle over cooled bars. Let it set for 10 minutes before slicing.
- Slice and serve: Use a sharp knife to cut into squares or bars. A warm bar is tempting, but the flavor and texture really shine once cooled.
A quick tip: if you find your peppermint chunks sinking to the bottom, toss them in a dusting of flour before folding into the dough; this helps suspend them evenly.
Cooking Tips & Techniques
One thing I learned the hard way is that temperature matters — especially the butter. If it’s too cold, you’ll struggle creaming it with sugar; too soft, and the dough can get greasy. Room temperature butter is the sweet spot, making the dough smooth and easy to work with.
Crushing the peppermint candy canes just right is another trick. Too fine, and it melts completely, losing that satisfying crunch. Too chunky, and the pieces don’t blend well. I aim for about pea-sized chunks, which balance melt and texture beautifully.
Watch your baking time closely. These bars are forgiving, but overbaking dries them out. The edges should be golden while the center remains soft but set. If you’re using a glass pan, sometimes the bottom bakes faster — rotating halfway through can help.
When it comes to cutting, let the bars cool fully. You’ll get cleaner slices and less crumbling. I sometimes chill the pan for 10 minutes after cooling to firm up the bars if I’m impatient.
Also, multitasking tip — while these bars bake, I usually prep a quick dinner like the one-skillet shrimp fried rice. It’s a lifesaver when you want something fast and satisfying alongside your holiday baking marathon.
Variations & Adaptations
These peppermint sugar cookie bars are pretty flexible, so you can tweak them based on your preferences or dietary needs.
- Chocolate Peppermint Bars: Add 1/2 cup mini chocolate chips or drizzle melted dark chocolate over the cooled bars for a classic combo.
- Gluten-Free Version: Swap all-purpose flour with a gluten-free blend like Bob’s Red Mill 1-to-1 Baking Flour. The texture stays tender and delicious.
- Dairy-Free Option: Use a plant-based butter substitute and almond or oat milk if making the optional glaze. You won’t miss the dairy.
- Spiced Up: Add 1/2 teaspoon ground cinnamon or a pinch of nutmeg to the flour mix for a warm holiday twist.
- Different Mints: Instead of candy canes, try crushed mint baking chips or peppermint extract (start with 1/2 teaspoon and adjust).
I once tried layering these bars with a thin spread of peppermint pie filling for a festive two-layer dessert — worked like a charm for a holiday potluck!
Serving & Storage Suggestions
Serving these bars slightly chilled or at room temperature works best. They have a tender chew that softens a bit when warmed, but the peppermint crunch stays intact longer when cool.
Try pairing them with a cup of hot cocoa or peppermint tea for a cozy afternoon treat. They also complement holiday cocktails or coffee drinks beautifully.
Store bars in an airtight container at room temperature for up to 3 days. For longer storage, refrigerate up to a week or freeze for up to 3 months. When freezing, wrap tightly in plastic wrap and foil to prevent freezer burn.
To reheat, let thaw at room temperature or pop individual bars in the microwave for 10-15 seconds — just enough to soften without melting the peppermint chunks.
Flavors tend to meld and mellow after a day or two, making them even more enjoyable. I often make them a day ahead to let the peppermint infuse gently into the dough.
Nutritional Information & Benefits
Each peppermint sugar cookie bar (based on 12 servings) has approximately:
| Calories | Fat | Carbohydrates | Protein |
|---|---|---|---|
| 220 kcal | 11g | 29g | 2g |
While these bars are an indulgent holiday treat, peppermint has some digestive benefits and a refreshing flavor that can help soothe the stomach. Using real vanilla and quality butter adds a richness that feels satisfying without needing extra toppings.
If you’re watching sugar intake, consider cutting back slightly on granulated sugar or using a sugar substitute compatible with baking. For a gluten-free or dairy-free diet, the substitutions mentioned earlier keep the recipe inclusive.
Conclusion
These Cozy Peppermint Sugar Cookie Bars became a holiday staple for me — simple enough to make on a busy day but special enough to share with loved ones. The blend of buttery sugar cookie dough with crisp peppermint bits feels like a festive hug in every bite.
Customizing them is a joy, whether adding chocolate, spices, or making them allergy-friendly. Honestly, the best part is how easy they come together, turning basic pantry ingredients into something memorable and cozy.
Give this recipe a try, and let it become your go-to peppermint treat this season. I’d love to hear how you personalize it or any fun twists you discover!
Frequently Asked Questions
Can I use crushed peppermint candies instead of candy canes?
Yes! Crushed peppermint candies work well and melt similarly during baking, offering the same refreshing flavor and crunch.
How do I store the peppermint sugar cookie bars?
Store them in an airtight container at room temperature for up to 3 days, or refrigerate for up to a week. They also freeze well for up to 3 months.
Can I make these bars vegan?
You can swap butter for a vegan butter alternative and use a flax egg or commercial egg replacer. The texture will be slightly different but still delicious.
Why are my peppermint pieces sinking to the bottom?
Coating the crushed peppermint in a light dusting of flour before folding them into the dough helps keep them suspended evenly during baking.
Can I add chocolate chips to this recipe?
Absolutely! Mini chocolate chips pair perfectly with peppermint and add a lovely melty texture to the bars.
Pin This Recipe!

Cozy Peppermint Sugar Cookie Bars

These peppermint sugar cookie bars combine a tender, buttery sugar cookie base with crushed peppermint candy canes for a festive and cozy holiday treat that’s quick and easy to make.
- Prep Time: 10 minutes
- Cook Time: 20-25 minutes
- Total Time: 30-35 minutes
- Yield: 12 servings 1x
- Category: Dessert
- Cuisine: American
Ingredients
- 1 cup (2 sticks, 226g) unsalted butter, softened
- 1 cup (200g) granulated sugar
- 1 large egg, at room temperature
- 1 teaspoon pure vanilla extract
- 2 1/2 cups (312g) all-purpose flour, sifted
- 1/2 teaspoon baking powder
- 1/4 teaspoon salt
- 3/4 cup crushed peppermint candy canes (about 6 standard-sized sticks)
- Optional: 1/2 cup powdered sugar (for dusting or glaze)
- Optional: 2 tablespoons milk (to make a simple glaze)
Instructions
- Preheat your oven to 350°F (175°C). Lightly grease your 9×13-inch baking pan or line it with parchment paper.
- In a large bowl, beat the softened butter and granulated sugar together until light and fluffy, about 3 to 5 minutes.
- Beat in the egg and vanilla extract until fully incorporated.
- In a separate bowl, whisk together the all-purpose flour, baking powder, and salt.
- Gradually add the flour mixture to the wet ingredients, mixing just until combined.
- Gently fold the crushed peppermint candy pieces into the dough, distributing them evenly.
- Transfer the dough to the prepared pan and press it down evenly with your hands or spatula.
- Bake for 20 to 25 minutes until edges are lightly golden and center is set but slightly soft.
- Remove from oven and let the bars cool completely in the pan on a wire rack.
- Optional: Whisk powdered sugar with milk until smooth and drizzle over cooled bars. Let set for 10 minutes.
- Slice into squares or bars and serve.
Notes
Use room temperature butter for best creaming results. Crush peppermint candy canes to pea-sized chunks for best texture. Coat peppermint pieces in flour before folding to prevent sinking. Let bars cool completely before slicing for cleaner cuts. Optional glaze adds extra sweetness. Variations include adding mini chocolate chips or using gluten-free flour.
Nutrition
- Serving Size: 1 bar (1/12th of rec
- Calories: 220
- Fat: 11
- Carbohydrates: 29
- Protein: 2
Keywords: peppermint sugar cookie bars, holiday dessert, peppermint candy, sugar cookie bars, easy holiday treats, peppermint bars, festive dessert